
git Blog를 시작하고 나서, 구글에 검색을 하면 나의 블로그가 검색이 안 될 것이다.
흔히 구글링이라고 하는 검색 결과에, 우리가 작성한 블로그도 검색되도록 해보자😎
기본 준비 할 것
OS : Window 10
- 개인 구글 계정 - 구글 검색엔진 등록용
- 개인 네이버 계정 - 네이버 검색엔진 등록용
- 개인용 Git Blog Url 복사해두기
검색엔진 등록 준비
아래 파일들은 반드시 _config.yml이 있는 위치와 동일하게 생성합니다.
1.sitemap.xml 파일 생성하기
sitemap.xml로 파일을 생성하여, 아래 내용을 그대로 넣어줍니다.
1
2
3
4
5
6
7
8
9
10
11
12
13
14
15
16
17
18
19
20
21
22
23
24
25
26
27
28
29
30
---
layout: null
---
<?xml version="1.0" encoding="UTF-8"?>
<urlset xmlns:xsi="http://www.w3.org/2001/XMLSchema-instance" xsi:schemaLocation="http://www.sitemaps.org/schemas/sitemap/0.9 http://www.sitemaps.org/schemas/sitemap/0.9/sitemap.xsd" xmlns="http://www.sitemaps.org/schemas/sitemap/0.9">
  {% for post in site.posts %}
    <url>
      <loc>{{ site.url }}{{ post.url }}</loc>
      {% if post.lastmod == null %}
        <lastmod>{{ post.date | date_to_xmlschema }}</lastmod>
      {% else %}
        <lastmod>{{ post.lastmod | date_to_xmlschema }}</lastmod>
      {% endif %}

      {% if post.sitemap.changefreq == null %}
        <changefreq>weekly</changefreq>
      {% else %}
        <changefreq>{{ post.sitemap.changefreq }}</changefreq>
      {% endif %}

      {% if post.sitemap.priority == null %}
          <priority>0.5</priority>
      {% else %}
        <priority>{{ post.sitemap.priority }}</priority>
      {% endif %}

    </url>
  {% endfor %}
</urlset>
2.robots.xml 생성하기
robots.xml로 파일을 생성하여, 아래 내용을 그대로 넣어줍니다.
1
2
3
User-agent: *
Allow: /
Sitemap: https://yenarue.github.io/sitemap.xml
3.feed.xml 생성하기
feed.xml로 파일을 생성하여, 아래 내용을 그대로 넣어줍니다.
1
2
3
4
5
6
7
8
9
10
11
12
13
14
15
16
17
18
19
20
21
22
23
24
25
26
27
28
29
---
layout: none
---
<?xml version="1.0" encoding="UTF-8"?>
<rss version="2.0" xmlns:atom="http://www.w3.org/2005/Atom">
  <channel>
    <title>{{ site.name | xml_escape }}</title>
    <description>{{ site.description | xml_escape }}</description>
    <link>{{ site.url }}</link>
    <atom:link href="{{ site.url }}/feed.xml" rel="self" type="application/rss+xml" />
	<lastBuildDate>{% for post in site.posts limit:1 %}{{ post.date | date_to_rfc822 }}{% endfor %}</lastBuildDate>
	{% for post in site.posts limit:10 %}
	<item>
		<title>{{ post.title | xml_escape }}</title>
        {% if post.author.name %}
            <dc:creator>{{ post.author.name | xml_escape }}</dc:creator>
        {% endif %}
        {% if post.excerpt %}
            <description>{{ post.excerpt | xml_escape }}</description>
        {% else %}
            <description>{{ post.content | xml_escape }}</description>
        {% endif %}
        <pubDate>{{ post.date | date_to_rfc822 }}</pubDate>
        <link>{{ site.url }}{{ post.url }}</link>
        <guid isPermaLink="true">{{ site.url }}{{ post.url }}</guid>
      </item>
    {% endfor %}
  </channel>
</rss>
4.위의 3개 파일 모두 push 합니다.
1
2
3
4
5
6
7

git add -A

git commit -m "작성메시지"

git push
구글 검색엔진 등록하기
1.google Search console에 접속합니다.
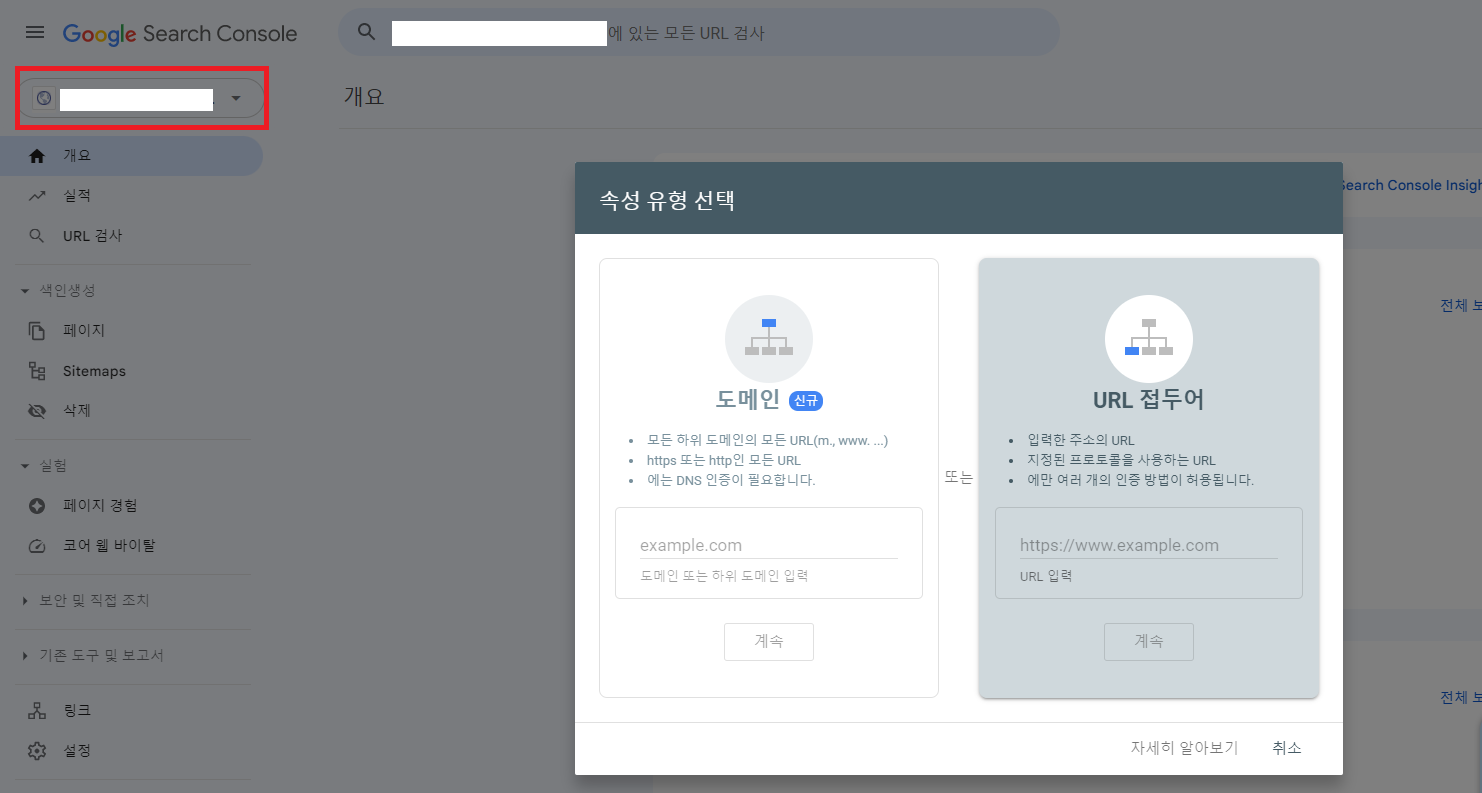
2.구글 로그인 완료 후, 아래와 같이 화면이 뜹니다.
이미 생성된 사이트가 있는 경우, 빨간 표시된 곳을 클릭 후 속성추가로 해당 화면을 띄워줍니다.
해당 화면에서 URL 접두어를 선택해줍니다.
3.본인의 Git Blog URL을 넣어줍니다. 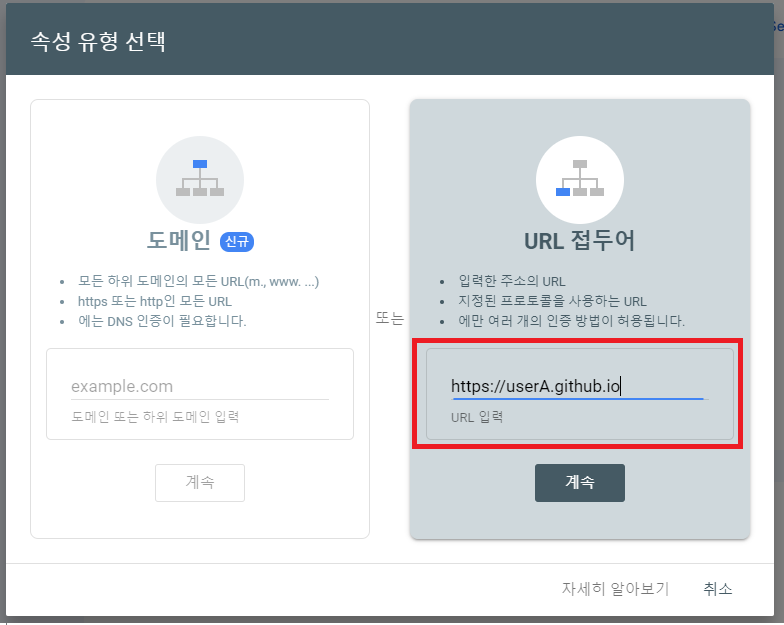
4.계속을 누르고, 아래와 같은 화면에서 빨간색으로 표시된 .html 파일을 다운받습니다 (절대 확인을 누르지마세요!!) 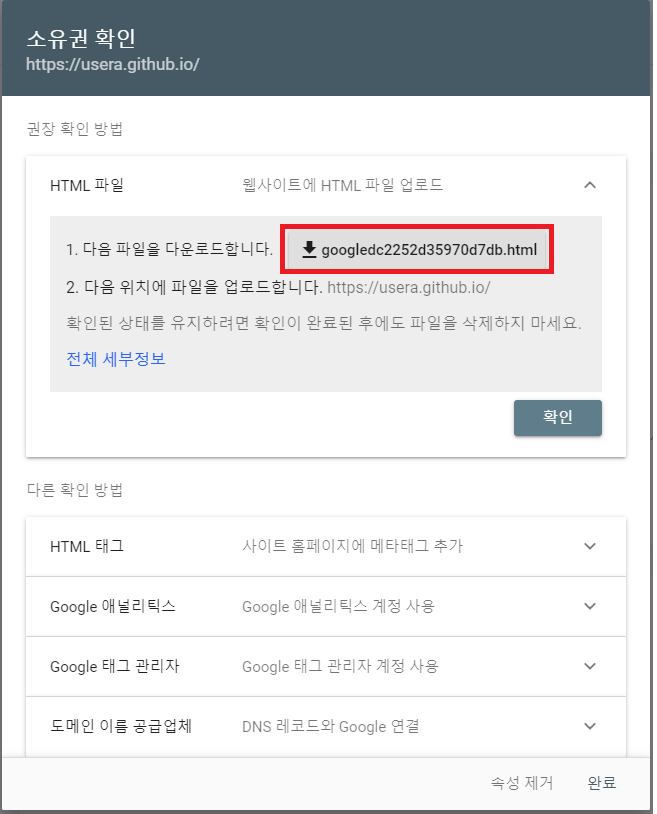
해당 파일을 _config.yml과 같은 위치에 넣습니다.
바로 커밋 및 푸쉬하여 확인해도 되지만 로컬 서버로 확인이 가능하다면 아래를 확인 후 push 합니다.
1
2
3
4
5
6
7
8
# local 확인
localhost:4000/다운받은파일.html

# 운영 확인
본인의 git Blog 주소/다운받은파일.html

# 404 등의 에러가 아닌, 무언가가 출력되면 맞는겁니다.
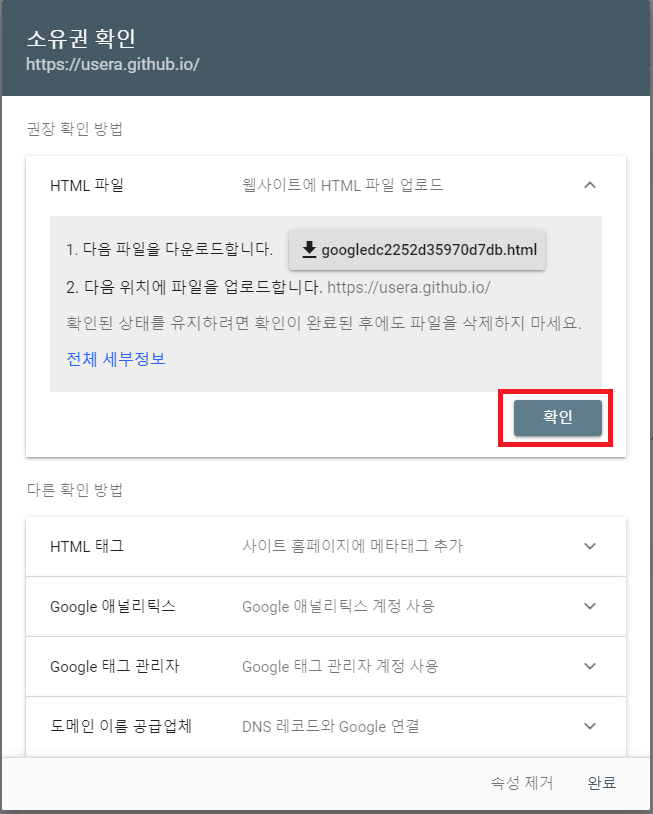
5.push 완료 후, 아래 버튼을 눌러줍니다.
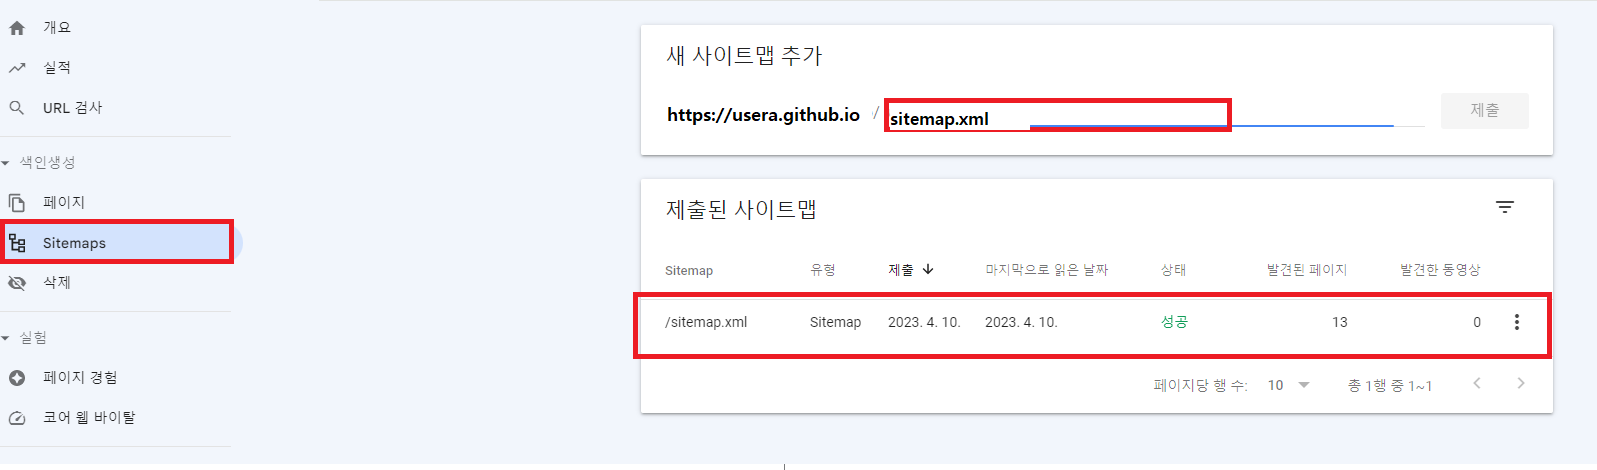
6.아래 메뉴에서 sitemap.xml을 등록하고, 목록이 아래와 같이 뜨는지 확인합니다.
네이버 검색엔진 등록하기
개발자의 대부분은 구글링을 하지만, 나는 일상생활 내용도 담기 위해 네이버 검색엔진에 등록한다.
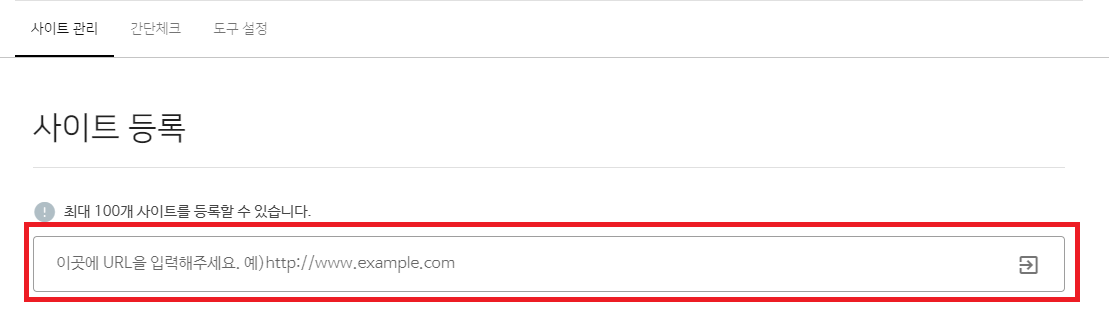
1.네이버 서치 어드바이저에 접속 후 웹마스터 도구에 들어간다.

2.접속 후, 아래의 부분에 본인 git blog url을 넣고 엔터를 친다.
3.아래와 같은 화면이 출력되고, 빨간색 부분을 눌러 .html 파일을 다운받는다. (절대 소유확인을 누르지마세요!!) 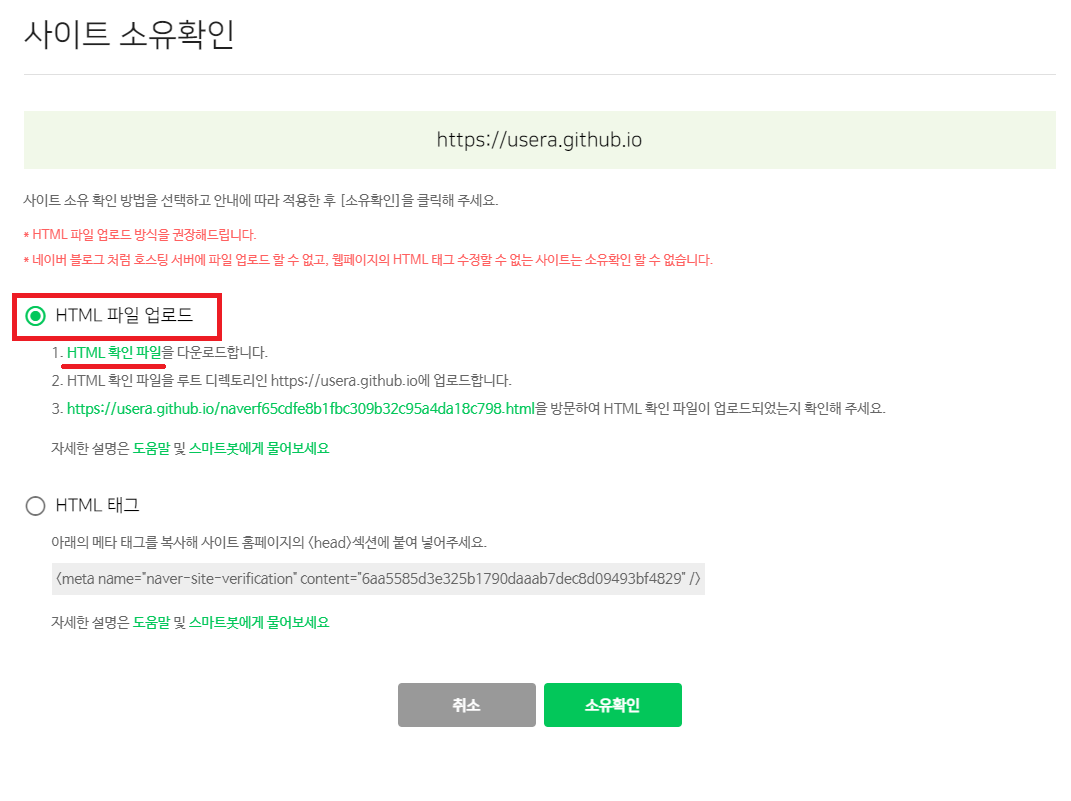
해당 파일을 _config.yml과 같은 위치에 넣습니다.
바로 커밋 및 푸쉬하여 확인해도 되지만 로컬 서버로 확인이 가능하다면 아래를 확인 후 push 합니다.
1
2
3
4
5
6
7
8
# local 확인
localhost:4000/다운받은파일.html

# 운영 확인
본인의 git Blog 주소/다운받은파일.html

# 404 등의 에러가 아닌, 무언가가 출력되면 맞는겁니다.
5.push 완료 후, 아래 버튼을 눌러줍니다.

6.아래처럼 사이트 목록에서 등록을 확인하고 클릭해줍니다. 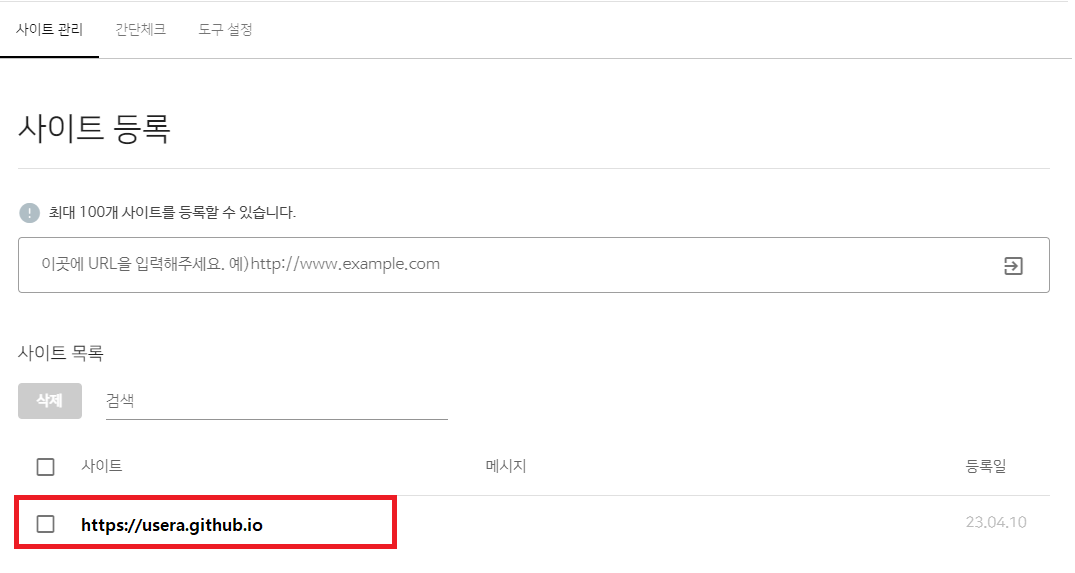
7.클릭 후, 이동된 화면에서 아래와 같이 sitemap.xml을 등록하고 확인합니다. 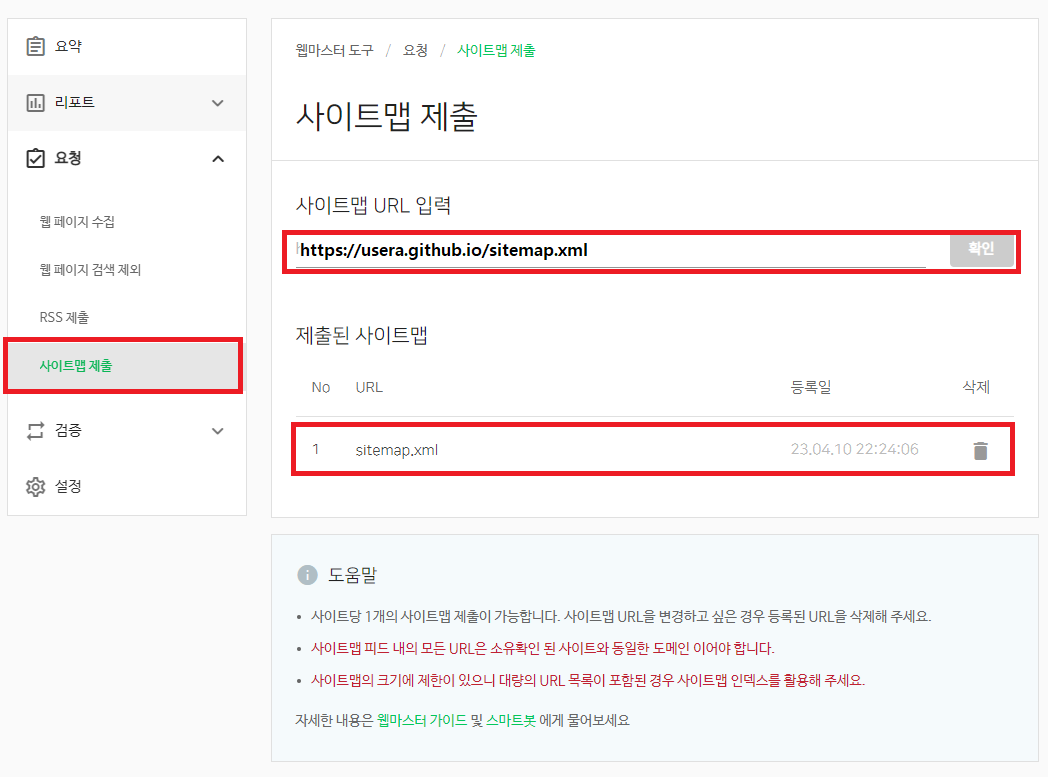
위와 같이 세팅하고 일주일 정도 기다리면, 작성한 게시물이 누군가에게 구글링될 수 있습니다:)
제가 작성한 게시물이 많은 사람에게 구글링되면 너무 좋을 것 같아요~ㅎㅎ